I have been learning computer programming for almost three years, and I’ve noticed a new development where I have the technical knowledge to actually help other developers. So, I thought I would start writing down the stuff I know well, to help me remember what I know, and for a reference for others. To this end, I’m starting with something simple, a Node app that responds to a request with a static file. Or, at least this is something that among experienced developers might seem simple, but I’m going to be a little bit verbose with this, because I’d like for someone with bare minimum web development knowledge to be able to at least get started with this Node app and come away from this tutorial with a solid foundation for the fun stuff that comes next. Still, I can’t explain everything, so sometimes I’ll send you off to learn more if you want.
For this tutorial, I am just going to go through the steps of setting up a Node server. From a client’s perspective (the client is the person/computer that is communicating with the server), this server will do just one thing: display a single, static HTML page. No CSS, no front-end JavaScript, no database connection, none of that, and only the bare minimum NPM packages (I will explain what NPM is in a little bit). In fact, we aren’t even going to run it on the actual internet, we are just going to run it locally. I should also add, if you are looking for an explanation of how servers in general work, the mechanics of the client-server communication, which is important if you want to do more serious Node stuff, I won’t be covering that here.
First, lets go over the broad strokes:
- Go to the NodeJS website and download NodeJS
- Make sure Node and NPM are installed and their PATHs defined
- Create a new project folder
- Start running NPM in your project folder (it runs in the background)
- Install any NPM packages we need
- Create an HTML file in the project folder (this is what the client will see)
- Create a Node/JavaScript file in the project folder (this is your server file)
- Run your server
- Visit your (local) website!
Step 1: Go to the NodeJS website and download NodeJS
Here is the NodeJS website. If you are following this tutorial, then I would recommend you download the LTS (Long-Term Support) version, that is the stable version that most people use and you will have a better time getting help if something breaks. This section title is technically misleading, you actually downloaded the NodeJS installer, and once that is done downloading, you should open it and follow the directions to install Node.
Step 2: Make sure Node and NPM are installed and their PATHs defined
Once you have NodeJS downloaded and installed, you will want to make sure that Node is in fact installed properly by running the following command in a terminal:
node -v
This should return a version number like this:
v14.15.0
When you install Node, you also install Node Package Manager, commonly referred to as simply NPM. As the command line is concerned you will most likely be interacting with NPM way more than with Node. I will explain what it does in a bit, but for now, just check that NPM is installed and it’s PATH is correct. To check these do the same thing you did for node:
npm -v
This will return a similar looking number, like:
6.14.8
In fact, this is a common technique for checking most programs on the command line. Without getting too deep into command line semantics, most (all?) programs that you will interact with on the command line can handle the -v flag, so you can almost always check that a tool/program you installed to work with on the command line works by following this format:
<name of program> -v
If everything goes as it should, you are ready for the next step. If you get this message back:
'node' is not recognized as an internal or external command,
operable program or batch file.
the first thing you should do is check your PATH variables, because 9/10 times, this is the issue with this error. In an attempt to keep this post as short as possible, I won’t go over troubleshooting this, but it’s a common enough problem that lots of people have asked about online. Once Node and NPM are working, we can move to the next step.
Step 3: Create a New Project Folder
You can put your project folder wherever you want on your computer, and name it whatever you want. This step is easy. Everyone knows how to create a new directory or folder, right?
Step 4: Start running NPM in your project folder
Okay, so what is NPM, anyway? You can go ahead and visit the website and see for yourself, but for someone just learning Node, lets keep it simple, a package is no more than a program that is designed to work with your Node app. When you need your web app to do something, perform some logic, manipulate some data, or communicate with another service somewhere else on the internet, instead of writing all of the code yourself in Node files, you can look for a package, download it, and add it to your project. That isn’t to say using an NPM package is always going to be easy, usually there is still some code you’ll need to write to create the interface between your Node project and the code from a package, and sometimes that code can be kind of tricky.
This is how you start running NPM in your project folder:
- open a terminal
- change directories until you are in your project folder
- run the command
npm initin the terminal
At this point you should be prompted for some information with this:
This utility will walk you through creating a package.json file.It only covers the most common items, and tries to guess sensible defaults.See `npm help init` for definitive documentation on these fieldsand exactly what they do.Use `npm install <pkg>` afterwards to install a package andsave it as a dependency in the package.json file.
And then under that should look like this:
Press ^C at any time to quit.package name: (simple-node-server)
The line, “package name: (simple-node-server)” and all subsequent lines that you will see during this set up first say what variable they are asking for (in this case, package name ), and to the right of that will either be something in parentheses or it will be blank. The values in parentheses are default values, and for each of these lines you can either just hit enter and accept the default (the blank defaults can also be accepted), or you can type in your own and then hit enter. Most people who are just starting out stick with the defaults.
One other thing to know about this setup is that the entry point variable is going to be your main server file (in larger projects, there are usually multiple server files, so Node will use the entry point file to start the app, but for simpler ones like this, we only need the one). Something that was confusing to me when I started working with Node is the different names devs give to their main server file, and the most common that I’ve seen are:
- index.js
- app.js
- server.js
The name of the main server file is arbitrary, and it can be confusing because some services that you will use with Node expect the server file to have a particular name and/or be in a particular place. Not super important for this simple server, but something to keep in mind if you start looking at examples.
When you are done, the terminal should look like this:
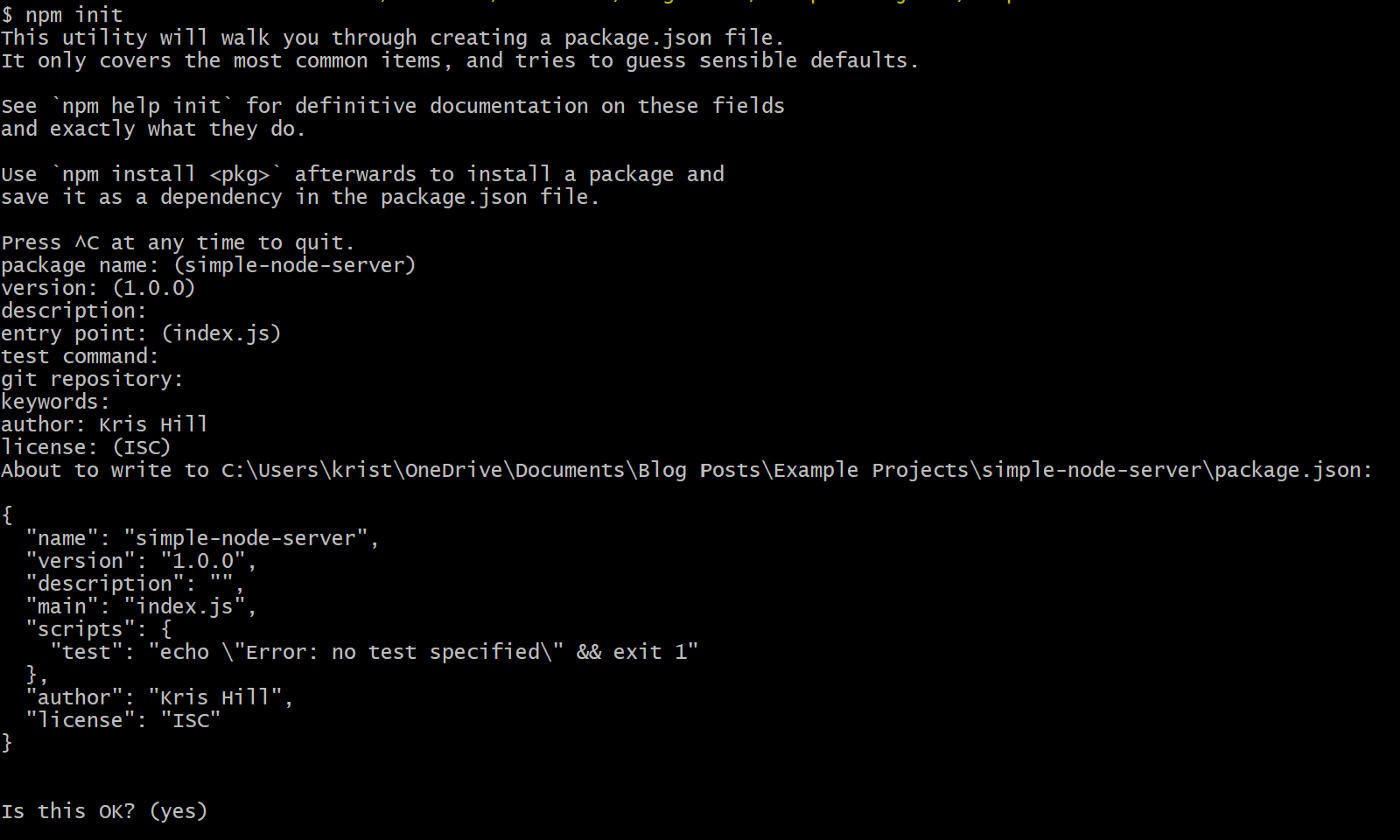
And you should have a file called package.json in your project folder that looks like this:
https://levelup.gitconnected.com/media/81737e67cf5df1a6356fc01bd279b51d
Step 5: Install Any NPM Packages:
Okay, now that we have NPM hooked up to our project, we are going to install one NPM package using the command line. You will use this particular package in most of your Node server projects. It is called Express.js, and it is so synonymous with Node itself, that in most of your Node projects you will actually be using objects and methods from Express that make it easier to run common web development processes like routing, database integration, error handling, and using front-end templates.
The package.json file that is in our root project folder holds some basic information about our app, but the most common use of package.json files is to save a record of all of the packages we download and save into our project. This is important because in order for our project code to run in other environments (like if you are working with a team, or you have an open-source project that you want others to be able to work on with their own computer, or if you want to deploy it on Amazon Web Services (AWS), Google App Engine (GAE), Heroku, or some similar service), the other environments need to know which NPM packages your project uses so they can be downloaded and saved. There are actually lots of different things a package.json does, but for now, you really only need to know that it holds your project’s basic information, including packages.
In short, there are two parts to connecting a package to our app:
- Download/install the package from NPM
- Save the package name and version number under “Dependencies” in your package.json
To download and install an NPM package into our project, in this case express , we will need to run the following command from your terminal (make sure you are in your project’s root folder when you run this):
npm i -s express
npmis the name of the program you are running-iis a shorthand alias for--install, you can use either. This will addexpressto a folder callednode_modulesin your root project folder. It should be noted that this folder is not added to your project folder until the first package is installed with NPM. (That’s why you don’t see it in your project folder yet).-sis a shorthand alias for--save, you can use either. This is a tag you can add to your npm install command to automatically save it to your package.json. It’s important to note that if you forget the-sor--saveyou can manually add the package name and version number to your package.json. However you do it, just make sure the package name and version number are in your package.json.
Step 6: Create an HTML file
This is probably the second simplest step after creating a project folder. Add a file to your folder with the extension ‘.html’. A common convention is to name the primary html file ‘index.html’, but this is not a hard rule, so you can name it whatever you want.
This is all you need in your html file, but feel free to make this into whatever kind of html page you want:
https://levelup.gitconnected.com/media/61bd8eae12c1e42991955e70ea376c20
Step 7: Create a Node/JavaScript file in the project folder
In your project’s root folder, create a file called, ‘index.js’. Yes, that’s right, there is now a file called ‘index.html’ and a file called ‘index.js’ in your root folder. If that’s confusing, you’ll just have to get use to it, and in fact, once you know the rule (more like a guideline), it can be handy in debugging if Node is having problems starting your server or rendering one of your pages. The rule is:
If there is no package.json file present in the directory, then Node.js will attempt to load an
index.jsorindex.nodefile out of that directory.
Many front-end frameworks, from templating engines like Handlebars to JavaScript frameworks like React, take advantage of this, looking in certain folders for index.js files as the entry point for that particular directory.
Anyway, if you know nothing about how servers actually work, here’s the most absolute basics of what a server does:
- Opens up a port to listen for incoming requests from clients
- Defines what to do with each request that comes in (the server’s response)
This is the simplest description of what is appropriately called the request-response cycle, and is how the internet works, mostly. So, we need to set up our server to do just that.
In a Node/Express app, this is done a certain way:
- Import the Express dependency that we just installed.
- Instantiate (meaning, create an instance of) an Express app object. This app object has a whole bunch of built-in methods and variables that you can use for your server, two of which you will see in a second.
- Save the port number in a variable. This is kind of optional in this app, but as you start developing apps with others and deploying your app to some cloud-based service, you’ll want to add some logic so your app can determine what kind of environment it’s working in and use the appropriate port.
- Set up the routes, in this case just one, and its job is to take any requests at the root of the app (‘/’) and respond by sending an HTML file to the client’s browser. Again, if you work on any Node app of serious size, you will have multiple routes, and often entirely separate router files, each with their own multiple routes, connected to your main server file.
- Finally, we need to set up the listening port for the server. This is what sits and waits for an incoming connection, and in Express apps, it is always at the end of the file.
Okay, so this is how you do it:
- To import a dependency into your Node file, you need to follow this format:
const <variable-name> = require('<name-of-package>');
Some quick points about this:
<variable-name>is an arbitrary name, you can use whatever you want, really. However, best practice is to name these variables after their respective dependency.require()is a built-in Node function that lets you gain access to another Node file’s code. You use this for every dependency you bring into your Node server, and you can also write your own Node files and import them into your main server file the same way.<name-of-package>should be the exact name of the folder or file you wish to import (if you’re just importing a JavaScript file, you can leave the file extension off). If it is an NPM package you’re importing, you can just use your package.json as a reference, because what is listed in the package.json should be the same string you require in your Node server file. In our package.json, the dependencies look like this:
"dependencies": { "express": "^4.17.1"}
So, the package.json says, ‘express’ and our require() function takes the string, ‘express’.
2. Next, we need to create an instance of the app object in Express. The app object is something you are going to want to understand thoroughly if you want to build apps with Node. We instantiate it like this:
const app = express();
- All this does is run the dependency you imported in the line above it, that dependency exports an app object and that app object is saved to the constant variable named app. It is this app object that holds the Express code, and with which you will be interacting the most.
3. This one is easy, for now just save a port number in the variable, port. Any number between 3000 and 8000 works, most people go with 3000 or 8000, specifically.
const port = 5000;
4. The app object contains several functions for routing requests, based on HTTP methods, the most common of these functions are:
- app.get()
- app.post()
- app.put()
- app.delete()
- app.use()
- app.all()
I think the most common one of these, and the one we are going to use right now, is app.get(), which is for GET requests, and is what you do every time you visit a website. GET requests are the most common kind of request on the internet, so let’s look at app.get(). The Express docs give us this definition:
app.get(path, callback [, callback …])
Routes HTTP GET requests to the specified path with the specified callback functions.
And they give us an example:
app.get('/', function (req, res) {
  res.send('GET request to homepage')
})
So we can see that from the definition we should expect app.get() to take two arguments, path and any callback functions. In the example, we can see that there are two arguments:
'/'= pathfunction (req, res) { res.send('GET request to homepage')}= callback function
In this example, there is only one callback function, but there could be a whole bunch of callback functions. In Express, they call these middleware, because they are inserted in the middle of your route, between when the server gets the client’s request and when the server sends its response back. Furthermore, in larger Node projects, the number of middleware functions can grow quite large, and often routes do have multiple middleware functions. There are also lots of NPM packages that you can use in your Node project that are written to be used like middleware. Indeed, that’s all Express is, really:
Express is a routing and middleware web framework that has minimal functionality of its own: An Express application is essentially a series of middleware function calls.
In Express, a lot of middleware will be defined elsewhere and passed to the routing function with its name, but the last callback function in a routing function usually looks like the one in this example, and you should know this about it:
- It takes two arguments: req and res. These are built-in objects that help you do a lot of fun stuff upon a new request-response cycle, and Express expects them in their middleware functions. For now, we aren’t using the req object, but if your app has inputs or url-encoded data (stuff that is passed to the server in the url), you can access that info with the req object. The res object is what you will use when it’s time for your server to send its response. It’s important to note that you don’t actually need to name them req and res, Express will use whatever names you use instead of req and res, but the documentation all references req and res, and the vast majority of Node servers stick with this convention, so I would too.
- It is actually slightly different than most of what is considered middleware, in that it doesn’t have a next argument, which most middleware use to tell Express to continue to the next middleware. As this function calls res.sendFile(), this is the end of the request-response cycle, the server is done with that request.
If you want to know more about res.sendFile(), go read the docs, but just know for now that
res.sendFile('<file-name>', {root: __dirname});
is how you send a file from the same folder (the root) that your server file (index.js) is in.
5. Lastly, we want to set up the code for the server to know to listen for incoming requests. The app object in Express has a function for this called app.listen(), and all of the arguments are optional, including the port number. However, generally you will see at least a port number, and often you will see a callback function passed as well. The full version of app.listen() that I use in my apps is:
app.listen(port, () => {
    console.log(`Now listening on port ${port}`);
});
OK, lets break this down and then we can wrap it up.
portis the same port we defined at the top of our index.js file() => {}is an arrow function, it does the exact same thing as a regular function in JavaScript, it just looks a little bit cleaner.console.log()is hopefully something you’ve seen before, but if not, this line will just print the string given to it onto the console.
In total, your index.js file should look like this:
https://levelup.gitconnected.com/media/b3ccdb0eb20c8351a09679c8a167a3be
Step 8: Start the Node Server
That’s it for the coding part of this. The next step is to actually start the server! You do that by opening up a terminal and running the command:
node index.js
You should see your console.log message show up in your console, with whatever port number you told it to use.
Step 9: Visit Your (Local) Site!
The only thing left to do is to go to your site. Your site is hosted on the localhost at the port you gave it. Open up a browser and use the following for your URL:
localhost:<port number>
And you should get whatever you had included in your HTML page! Congratulations, you hosted your first Node site!
